Document archive automation using Fujitsu ScanSnap and Hazel on a Mac
03.12.2016 | Computer & co.
This is a translation of a german blog post I published the other day, because this might be of interest for international readers too.
An electronic document archive has some advantages like full text search and quick and easy access to documents via mobile phone. Unfortunately the maintenance comes with a lot of work. This can be mitigated by automation using modern methods. I describe in this article how you can fully automate the archiving process by using the scanner SnapScan and the Mac software „Hazel“ (https://www.noodlesoft.com). Hazel can monitor folders and take action based on their content. I set up a folder structure for my procedure which follows the archiving steps:
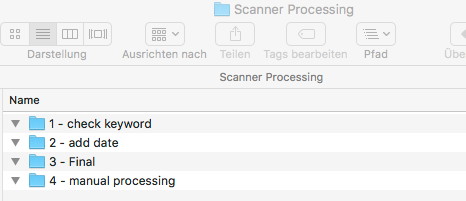
The folder which contains all of that got the name „Scanner Processing“. It contains sub-folders for the different Hazel processing steps.
And this is the way it works:
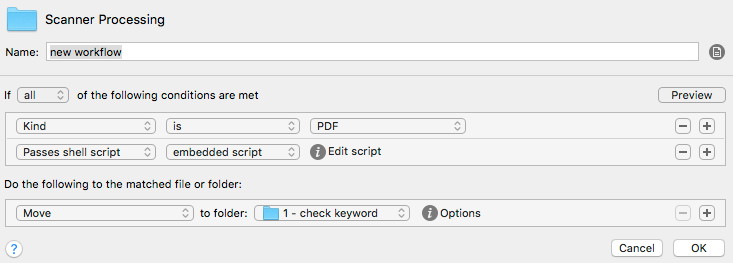
The software of Fujitsu is setup in such a way that the scan result is saved in the top folder level. Here comes the first challenge: The OCR detection starts right after the scan process and the PDF output is complete after this step. Therefore Hazel has to spot this, otherwise it would run into a conflict if it starts processing right away. The Hazel procedure to resolve this is:
The shell script is:
#! /bin/bash
if [ `pdffonts „$1“ | grep Type | sed -n ‚$=’` ]
then
exit 1
else
exit 0
fi
A simple explanation of this is: If there’s a PDF file in the folder and this contains any text, then shift the file to „1 – check keyword“ to perform the archiving procedure. The file gets text information after the OCR step, which indicates the the scanner software finalizes it’s work.
I put a lot but very simple rules into the folder monitoring for „1 – check keyword“ which looks at the document content and do assignments based on this. Example:
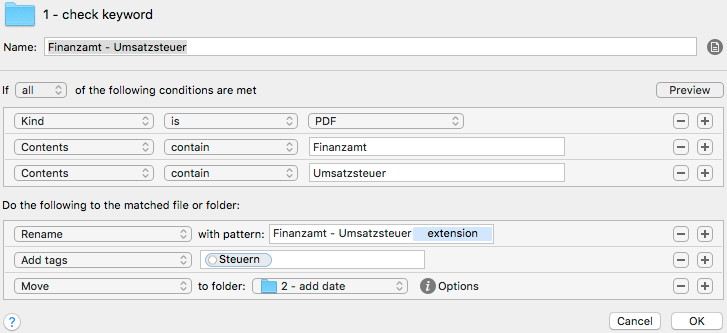
The rule is: if the documents contains the words „Finanzamt“ (finance office) and „Umsatzsteuer“ (turnover tax) then rename the file to „Finanzamt – Umsatzsteuer.pdf“, attach the attribute „Steuern“ (tax) and move it to „2 – add date“. The attribute contains the name of the target folder used later.
Now the date is looked up in the document, read out and used in the preferred format for the file name:
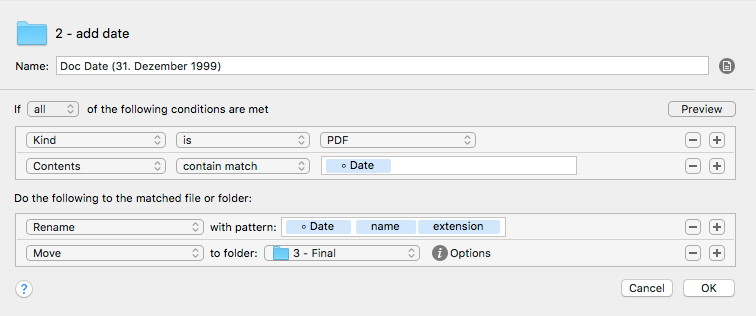
I use multiple rules to compile different formats of the date. Here comes the real power of Hazel which is accessible via simple mouse clicks:
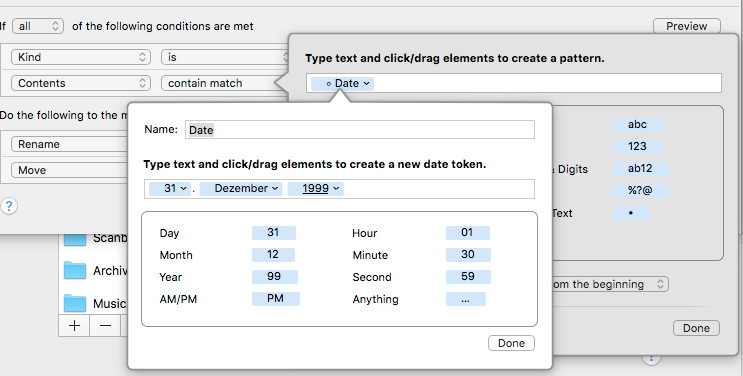
In my case the date is positioned at the beginning of the file name. You can easily decide on another position by shifting it. Because Hazel „understands“ the date it can be transferred into a different format for the file name as well. This is very simple to achieve:
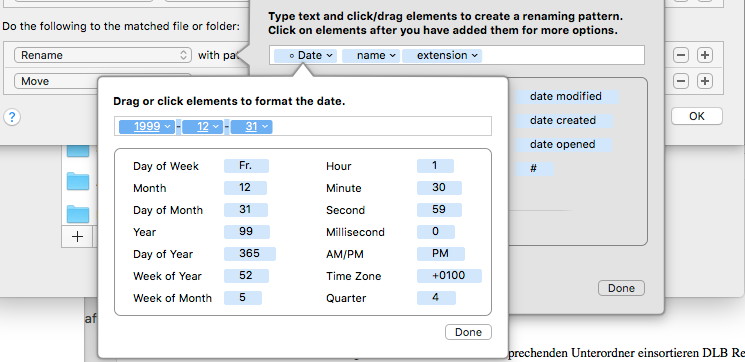
The document is moved to „3 – Final“ at the end of this rule where the sorting happens.
Unfortunately the sorting process can’t be done with one rule in Hazel. Every target folder needs a separate one. It looks like this:
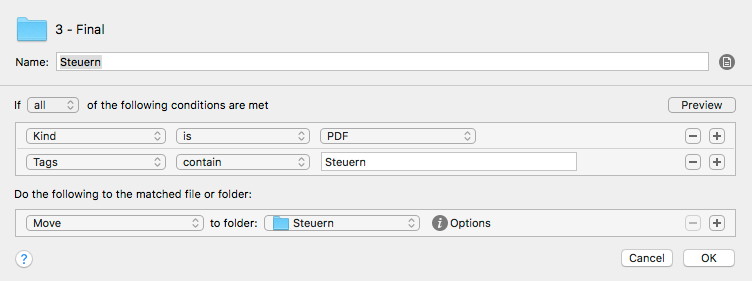
The rule looks for a dedicated attribute and moves the document to the according folder structure. The target folder is generated if the it doesn’t exist.
If a document as no attribute (meaning no key word found before) or no sorting rule applies, then I move the file to „4 – manual processing“. This is always the last rule of this folder monitoring:
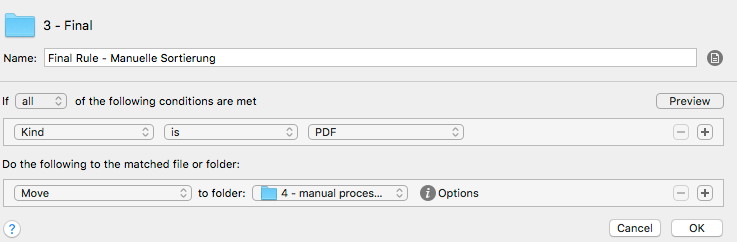
By doing so I can be sure that I don’t lose anything and I can easily adapt my rules based on this. Because my folder structure is quite stable I only have to adapt the keyword rule from time to time. Then I just copy an existing rule and change it which take a couple of seconds only.
In case of feedback tweet me on @jostmac please
An electronic document archive has some advantages like full text search and quick and easy access to documents via mobile phone. Unfortunately the maintenance comes with a lot of work. This can be mitigated by automation using modern methods. I describe in this article how you can fully automate the archiving process by using the scanner SnapScan and the Mac software „Hazel“ (https://www.noodlesoft.com). Hazel can monitor folders and take action based on their content. I set up a folder structure for my procedure which follows the archiving steps:
The folder which contains all of that got the name „Scanner Processing“. It contains sub-folders for the different Hazel processing steps.
And this is the way it works:
The software of Fujitsu is setup in such a way that the scan result is saved in the top folder level. Here comes the first challenge: The OCR detection starts right after the scan process and the PDF output is complete after this step. Therefore Hazel has to spot this, otherwise it would run into a conflict if it starts processing right away. The Hazel procedure to resolve this is:
The shell script is:
#! /bin/bash
if [ `pdffonts „$1“ | grep Type | sed -n ‚$=’` ]
then
exit 1
else
exit 0
fi
A simple explanation of this is: If there’s a PDF file in the folder and this contains any text, then shift the file to „1 – check keyword“ to perform the archiving procedure. The file gets text information after the OCR step, which indicates the the scanner software finalizes it’s work.
I put a lot but very simple rules into the folder monitoring for „1 – check keyword“ which looks at the document content and do assignments based on this. Example:
The rule is: if the documents contains the words „Finanzamt“ (finance office) and „Umsatzsteuer“ (turnover tax) then rename the file to „Finanzamt – Umsatzsteuer.pdf“, attach the attribute „Steuern“ (tax) and move it to „2 – add date“. The attribute contains the name of the target folder used later.
Now the date is looked up in the document, read out and used in the preferred format for the file name:
I use multiple rules to compile different formats of the date. Here comes the real power of Hazel which is accessible via simple mouse clicks:
In my case the date is positioned at the beginning of the file name. You can easily decide on another position by shifting it. Because Hazel „understands“ the date it can be transferred into a different format for the file name as well. This is very simple to achieve:
The document is moved to „3 – Final“ at the end of this rule where the sorting happens.
Unfortunately the sorting process can’t be done with one rule in Hazel. Every target folder needs a separate one. It looks like this:
The rule looks for a dedicated attribute and moves the document to the according folder structure. The target folder is generated if the it doesn’t exist.
If a document as no attribute (meaning no key word found before) or no sorting rule applies, then I move the file to „4 – manual processing“. This is always the last rule of this folder monitoring:
By doing so I can be sure that I don’t lose anything and I can easily adapt my rules based on this. Because my folder structure is quite stable I only have to adapt the keyword rule from time to time. Then I just copy an existing rule and change it which take a couple of seconds only.
In case of feedback tweet me on @jostmac please